API 插件设计文档 & 使用指南
本文前半部分讨论 API 插件解决什么问题、为什么这样设计,后半部分介绍 API 插件怎么用。
如果您只关心 API 插件的用法,可以直接跳到 2.4. 使用指南
1. 需求分析
1.1. 解决什么问题
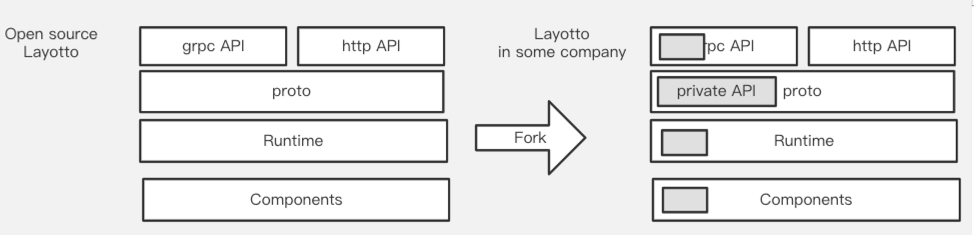
解决扩展性问题。不管是 Dapr 还是开源 Layotto 的 API,目前都无法完全满足生产需求。
回看操作系统领域 POSIX API 和 system call 的发展历史,我们可以学到很多,借此预测 Runtime 的未来。我们可以说,Runtime API 将来也不可能完全满足用户需求。想想 OS 领域,即使有 POSIX API 了,一些场景还是需要绕开标准 API、用特殊指令操作特殊硬件。
Dapr 的扩展性是通过 Binding API 解决,但是这种非结构化的 API �有很多问题(比如破坏可移植性、不支持 stream 等语义)
1.2. 用户场景和需求
举例来说,有以下用户场景:
- 公司有自己的定制 API 需求,因为是非通用需求、不适合做到开源 Layotto/Dapr 上,于是公司的中间件团队想自己开发到 sidecar 里。如果公司的项目 import 开源 Layotto 或者 Dapr,按目前的架构是没法扩展开发 API 的,只能 Fork 出来做扩展
这种情况下的用户需求:
- sdk 下沉;
- 支持多语言;
- 多云部署(只不过需要中间件团队自己为多云环境开发组件,没有社区现成的组件拿来用了)
- 公司有新 API 需求,适合做到开源项目里,于是提需求给社区,但是社区很难达成共识、争了几个月还没落地(例如https://github.com/dapr/dapr/issues/2988 )。这种情况公司可能有业务压力,没法等那么久,希望自己先实现、落地,等社区实现新功能后再迁移过来。
这种情况下的用户需求:
- 用户对该功能自主可控,不需要(同时用中文和英文)说服社区、说服世界才能做这个功能
- 快速扩展、服务业务
- 用户想给 Dapr API 加字段,先在自己的 Fork 版本里添加了字段、满足线上需求,然后将 PR 提给社区。社区拒绝添加该字段�,PR 被关闭。用户很尴尬:这字段已经在线上使用了,怎么处理?
2. High level design
2.1. Hierarchical API
参考 OS 领域当年是怎么定 API 的,我们可以把 Runtime API 设计成多层:

分别对应 OS 领域的:
- POSIX API
- 各种 Unix-like 系统自己的 System Call (有可移植性,通过不同的硬件驱动实现相同的接口)
- 特殊硬件提供的特殊功能 (没有可移植性)
基于这种思想,我们可以设计 API 插件,支持用户扩展自己的私有 API

2.2. 设计目标
-
让有定制开发需求的开源用户通过 import Layotto 的方式使用 Layotto,而不是 Fork
-
开发 api plugin 足够简单
-
配置文件公用同一个 json ,新增 api plugin 无需新增配置文件
2.3. 功能设计

Layotto 新增若干扩展点。
企业用户在使用 Layotto 时,可以自己维护一个项目、import Layotto。自己的项目里存放各种扩展插件、组件。如果您熟悉 Java,这就类似于 Java 社区想要用 Eureka 时,可以 import Eureka、然后做扩展。
当用户想新增一类 API 时,可以在自己的项目里开发一个 package(包括自己的 proto,pb 文件,自己的 API 实现),然后在 main.go 里调用 Layotto 的扩展点、将自己的 API 注册进 Layotto。
2.4. 使用指南
如何添加自己的 proto、添加自己的私有 API?
一个示例是 项目中提供的 helloworld 包 ,实现了自定义的 API, SayHello
以此为例,解释下写 API 插件的步骤:
step 0. 定义自己的 proto 文件、编译成 pb
比如用户想新增一个自己的 Greeter API,提供 SayHello 方法,那么需要先写个 proto:
(这个例子是我从 grpc 官方示例 粘贴过来的)
syntax = "proto3";

option go_package = "google.golang.org/grpc/examples/helloworld/helloworld";
option java_multiple_files = true;
option java_package = "io.grpc.examples.helloworld";
option java_outer_classname = "HelloWorldProto";

package helloworld;

// The greeting service definition.
service Greeter {
  // Sends a greeting
  rpc SayHello (HelloRequest) returns (HelloReply) {}
}

// The request message containing the user's name.
message HelloRequest {
  string name = 1;
}

// The response message containing the greetings
message HelloReply {
  string message = 1;
}
然后把它编译成 .pb.go 文件。
项目中提供的 helloworld 示例包 偷了个懒,直接 import 了 grpc 官方编译好的 .pb.go 文件:

step 1. 为刚才定义的 API 编写实现
protoc 编译工具会根据 proto 文件帮你编译出 go 语言的 interface helloworld.GreeterServer,但是 interface 的具体实现还是需要自己写。
比如,示例中我们编写的 server 实现了 helloworld.GreeterServer interface, 有 SayHello 方法:
// server is used to implement helloworld.GreeterServer.
type server struct {
	appId string
	// custom components which implements the `HelloWorld` interface
	name2component map[string]component.HelloWorld
	// LockStore components. They are not used in this demo, we put them here as a demo.
	name2LockStore map[string]lock.LockStore
	pb.UnimplementedGreeterServer
}

// SayHello implements helloworld.GreeterServer.SayHello
func (s *server) SayHello(ctx context.Context, in *pb.HelloRequest) (*pb.HelloReply, error) {
	if _, ok := s.name2component[componentName]; !ok {
		return &pb.HelloReply{Message: "We don't want to talk with you!"}, nil
	}
	message, err := s.name2component[componentName].SayHello(in.GetName())
	if err != nil {
		return nil, err
	}
	return &pb.HelloReply{Message: message}, nil
}
step 2. 实现 GrpcAPI interface ,管理 API 插件的生命周期
现在你已经有了自己的 API 实现,下一步需要把它注册到 Layotto 上。
回忆一下:如何把 API 注册到原生的 grpc server 上?
只需要写这么一行代码:
pb.RegisterGreeterServer(s, &server)
想要把自己的 API 注册到 Layotto 上,需要:
- 实现
GrpcAPIinterface 、实现一些生命周期钩子
这个 GrpcAPI 负责管理您的 API 的生命周期、提供了各种生命周期钩子。目前生命周期钩子有 Init 和 Register 。
// GrpcAPI is the interface of API plugin. It has lifecycle related methods
type GrpcAPI interface {
    // init this API before binding it to the grpc server.
    // For example,you can call app to query their subscriptions.
    Init(conn *grpc.ClientConn) error

    // Bind this API to the grpc server
    Register(s *grpc.Server, registeredServer mgrpc.RegisteredServer) (mgrpc.RegisteredServer, error)
}
- 实现相应的构造函数
NewGrpcAPI,用来创建你的GrpcAPI。
// NewGrpcAPI is the constructor of GrpcAPI
type NewGrpcAPI func (applicationContext *ApplicationContext) GrpcAPI
其中传入的参数*ApplicationContext定义为:
// ApplicationContext contains all you need to construct your GrpcAPI, such as all the components.
// For example, your `SuperState` GrpcAPI can hold the `StateStores` components and use them to implement your own `Super State API` logic.
type ApplicationContext struct {
    AppId                 string
    Hellos                map[string]hello.HelloService
    ConfigStores          map[string]configstores.Store
    Rpcs                  map[string]rpc.Invoker
    PubSubs               map[string]pubsub.PubSub
    StateStores           map[string]state.Store
    Files                 map[string]file.File
    LockStores            map[string]lock.LockStore
    Sequencers            map[string]sequencer.Store
    SendToOutputBindingFn func(name string, req *bindings.InvokeRequest) (*bindings.InvokeResponse, error)
    SecretStores          map[string]secretstores.SecretStore
    CustomComponent       map[string]map[string]custom.Component
}
解释:CustomComponent是什么?
是"自定义组件"。
Layotto 中的组件分为两种:
- 预置组件
比如 pubsub 组件,比如 state 组件
- 自定义组件
允许您自己扩展自己的组件,比如下面示例中的 HelloWorld 组件。
解释:如何配置自定义组件?
看个例子
看个具体的例子,在helloworld 示例中, *server 实现了 Init
和 Register 方法:
func (s *server) Init(conn *rawGRPC.ClientConn) error {
	return nil
}

func (s *server) Register(grpcServer *rawGRPC.Server, registeredServer mgrpc.RegisteredServer) (mgrpc.RegisteredServer, error) {
	pb.RegisterGreeterServer(grpcServer, s)
	return registeredServer, nil
}
也有相应的构造函数:
func NewHelloWorldAPI(ac *grpc_api.ApplicationContext) grpc.GrpcAPI {
	// 1. convert custom components
	name2component := make(map[string]component.HelloWorld)
	if len(ac.CustomComponent) != 0 {
		// we only care about those components of type "helloworld"
		name2comp, ok := ac.CustomComponent[kind]
		if ok && len(name2comp) > 0 {
			for name, v := range name2comp {
				// convert them using type assertion
				comp, ok := v.(component.HelloWorld)
				if !ok {
					errMsg := fmt.Sprintf("custom component %s does not implement HelloWorld interface", name)
					log.DefaultLogger.Errorf(errMsg)
				}
				name2component[name] = comp
			}
		}
	}
	// 2. construct your API implementation
	return &server{
		appId: ac.AppId,
		// Your API plugin can store and use all the components.
		// For example,this demo set all the LockStore components here.
		name2LockStore: ac.LockStores,
		// Custom components of type "helloworld"
		name2component: name2component,
	}
}
解释:这些回调函数、构造函数是干嘛的?
看了这个例子,你也许会问:这些回调函数、构造函数是干嘛的?
上述钩子用于给用户扩展自定义启动逻辑。Layotto 会在启动过程中回调上述生命周期钩子和构造函数。调用顺序大致为:
Layotto 初始化好所有组件 ---> 调用NewGrpcAPI构造函��数 ---> GrpcAPI.Init ---> Layotto 创建 grpc 服务器 ---> GrpcAPI.Register
图示如下:

step 3. 将自己的 API 注册进 Layotto
按照上文的步骤实现自己的私有 API 后,可以在 main 里将它注册进 Layotto :
func NewRuntimeGrpcServer(data json.RawMessage, opts ...grpc.ServerOption) (mgrpc.RegisteredServer, error) {
	// ...........

    // 3. run
    server, err := rt.Run(
        runtime.WithGrpcOptions(opts...),
        // register your GrpcAPI here
        runtime.WithGrpcAPI(
            // default GrpcAPI
            default_api.NewGrpcAPI,
            // a demo to show how to register your own GrpcAPI
            helloworld_api.NewHelloWorldAPI,
        ),
        // Hello
        runtime.WithHelloFactory(
            hello.NewHelloFactory("helloworld", helloworld.NewHelloWorld),
        ),
    // ...........
我们推荐用户在自己的项目中定制 main 函数、定制启动流程。
具体来说,您可以把 Layotto 的 main 复制粘贴到自己的项目里,按需修改,去掉用不到的东西(比如用不到 etcd 的分布式锁组件,可以在自己的 main 里删掉它)
step 4. 编译运行 Layotto
准备就绪,可以启动 Layotto 了。
以 helloworld 为例:
cd ${project_path}/cmd/layotto_multiple_api
go build -o layotto
# run it
./layotto start -c ../../configs/config_standalone.json
Layotto 启动过程中,会回调每个注册进来的 API 的生命周期方法(Init,Register)
启动完成后,您的 API 就会对外提供 grpc 服务